
All content Copyright 2022 Parallel Systems Ltd.
1. Select Options>Design Template from the top menu.
2. Left-click the Title Block tab, and in the Title field enter:
Lesson10
3. Left-click>OK.
4. In the Capture session window, select File>New>Project.
The New Project window appears.
5. In the Name field, enter:
Lesson10
6. Use the “…” button to specify the location. Browse to the C:\OrCAD_Training\Capture folder and use the New Folder button to create a new folder named Lesson 10.
7. With the new Lesson10 selected, left-click>Select Folder.
8. Compare your new project settings to the following example.
(Check sure the Location field is correct.)
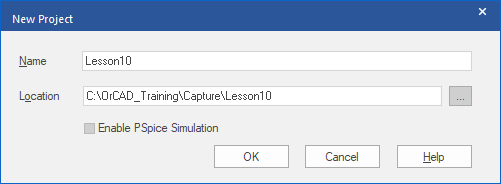
9. In the New Project window, left-click>OK.
The New Project Wizard completes the new project setup. The design resources for the new Lesson10 project are displayed in the Project Manager window, along with a blank schematic page.
10. Left-click in the schematic window to make it active.
11. Left-click the Zoom to All icon.
Observe that the data in the title block reflects the change you made to the design template.
12. Using Windows Explorer, navigate to the directory:
C:\OrCAD_Training\Capture\Lesson10
13. Observe the following files in the project directory:
Lesson10.dsn – binary design file
Lesson10.opj – ASCII project file
Lesson10.DSNlck – DSN lock file
14. Close Windows Explorer.
15. Left-click in the Project Manager pane to make it active.
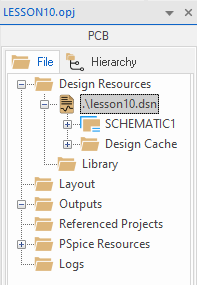
16. Left-click on the plus sign (+) to the left of .\Lesson10.dsn.
The display expands to show the contents of the design file.
17. Left-click on the plus sign to the left of SCHEMATIC1.
The display expands to show PAGE1 of the schematic.
18. Left-click on the plus sign to the left of Design Cache.
The display expands to show the parts that have been added to the design. The only symbol currently in the design is TitleBlock0.
Files within the Design Cache folder are binary files, which can only be viewed from the Project Manager window.
End of Lab
All content Copyright 2022 Parallel Systems Ltd.