
All content Copyright 2022 Parallel Systems Ltd.
1. In the Project Manager window, left-click on .\training.dsn entry and select Tools>Annotate from the top menu.
2. In the Scope section, make sure the Update Entire Design option is selected.
This means that all schematic folders in the Project Manager window will be annotated.
3. In the Action section, be sure Incremental Reference Update is selected.
This option only assigns part references to parts that do not already have part references assigned.
4. In the Mode section, the Update Occurrences (Preferred) option should be selected by default. If not, select it now. (See the following selections.)
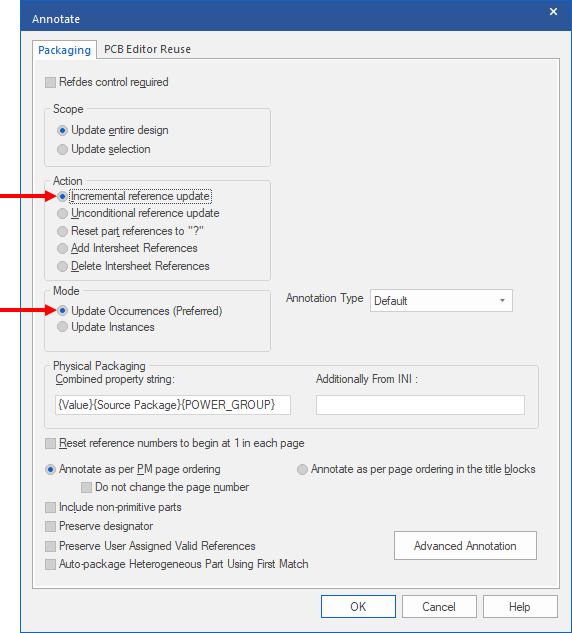
5. Left-click>OK to annotate the design, and left-click>OK to continue.
The design is annotated and saved to disk.
When annotating a hierarchical design, Capture annotates first in the root schematic folder, then in other schematic folders connected hierarchically to the root folder.
6. Open PAGE1 of the Data Schematic.
Observe that all the parts in this page now have part references assigned.
7. Left-click the DAAMP1 block to select it and right-click>Descend Hierarchy
(or double-click or press Shift+D).
The underlying schematic is displayed. Observe some of the part references assigned to the parts in this schematic.
8. Right-click>Ascend Hierarchy.
(or press Shift+A)
9. Now descend into the DAAMP2 block, as in step 7.
You now have schematics for both DAAMP blocks open.
10. Use the tabs to toggle between the two DAAMP Circuit schematics. They are the same schematic, but with different part reference assignments.
Because there are two DAAMP block symbols in the design, the parts in each of those DAAMP Circuit schematics occur more than once in the hierarchical design. This is known as complex hierarchy, and is the reason Capture differentiates between “instances” and “occurrences”.
11. Close all three schematic windows.
12. In the Project Manager window, double-click PAGE1 of the schematic page in the DAAMP Circuit folder.
13. Observe that you are prompted for a specific occurrence of the schematic page (DAAMP1 or DAAMP2) as shown in the graphic that follows.
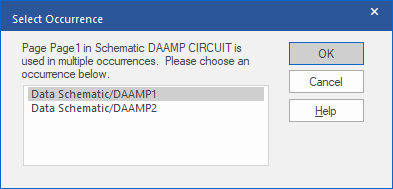
14. Leave the default selection of the Data/DAAMP1 entry and left-click>OK.
The schematic associated with the DAAMP1 block symbol is displayed.
15. Close the schematic window.
16. In the Project Manager window, left-click on the .\training.dsn entry and save the design.
End of Lab
All content Copyright 2022 Parallel Systems Ltd.