
All content Copyright 2022 Parallel Systems Ltd.
If you completed routing the board in Lab 12-3, you can continue with that board for the remainder of the course but note that the layer names will be different from those setup in Session 5, or use the autorouted board saved from the Lab 12-4, or use the provided routed.brd.
1. Select Display>Zoom>Fit from the top menu, or press F2.
2. Select Display>Show Rats> All from the top menu.
Any unconnected nets display as ratsnest lines.
3. Choose Export>Reports. (or use Export>Quick Reports)
4. Scroll through the list of reports and double-click the Unconnected Pins Report.
5. Left-click>Generate Reports.
A report window appears with a list of all unconnected pins, if all nets have been routed, your report states:
Total Unconnected Pins: 0
6. Left-click the “X” icon to close the Unconnected Pins report.
7. Left-click>Close to close the report control window.
8. Select Check>Status to check for the number of unconnected pins.
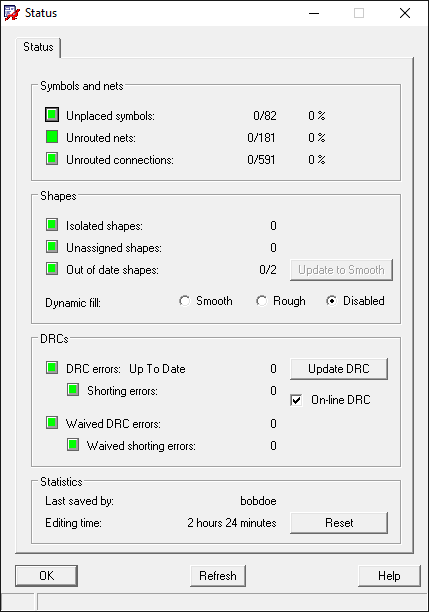
Now is also the time to check for any DRCs that may have been created during routing.
The previous screen shot shows no DRCs but you can left-click the button to the left of “DRC errors – Up to Date” to get to a Quick Report of DRC Errors, if you have any. You can use the “links” in the displayed report to navigate through the design to get to the error locations, you probably need to zoom into the board to see the locations.
If you can’t see the DRCs in the canvas, check Setup>Colors, Layers tab and enable “all” for the DRC column.
If the DRCs are not large enough graphically, you can use Setup>Design Parameters, Display tab, DRC Marker Size is 0.635mm by default, increase the value. You can also fill the DRC markers from Setup>User Preferences, Display, Visual, enable display_drcfill.
You can also use Tools>DRC Browser to browse the DRCs in the design.
9. Use File>Save As and save the board as routed.brd (Overwrite if necessary)
End of Lab
All content Copyright 2022 Parallel Systems Ltd.