
All content Copyright 2022 Parallel Systems Ltd.
1. If you have closed the Hier_clip circuit, reopen it.
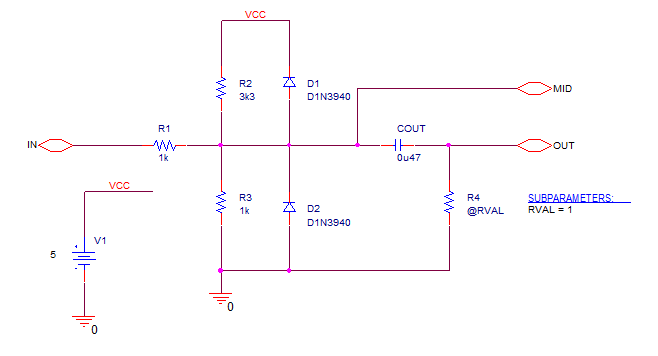
2. Descend into Clip_Bot and edit it as shown below. You will need to add the Subparam part, define a New Property called Rval with a default value of 1, and give R4 the value of @RVAL.
(Use the Display to set the property display to Name and Value to match this screen shot)
3. Save the file and ascend back up to Clip_Top.
4. Place another occurrence of the Clip_top symbol and wire it up like the following picture.
(Using a copy of the currently placed part will work best, otherwise a new copy of the library part will require editing, why? would be worth considering)
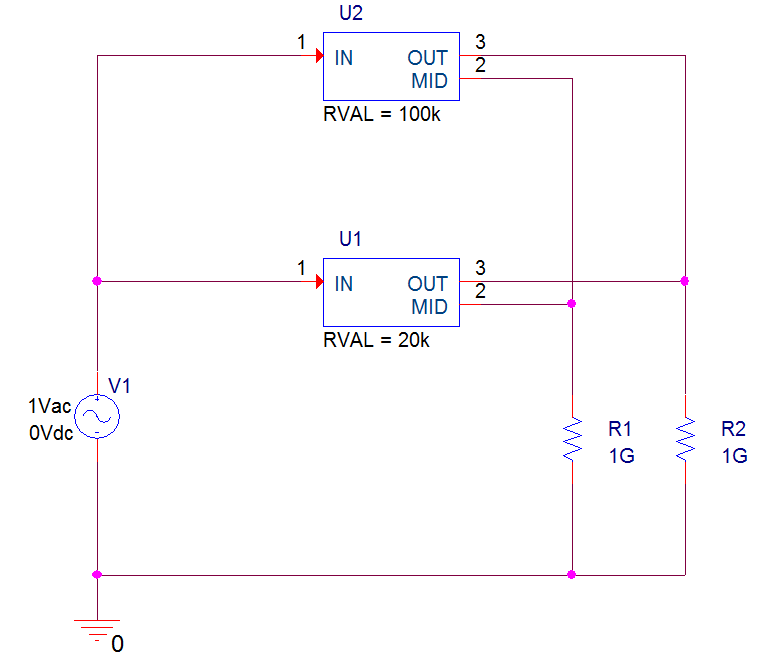
5. Edit the properties of each Clip_top part and define a new property called Rval with the default values as shown in the preceding picture.
6. Go to the Project Manager for Hier_clip.
7. Left-click the design (dsn) file entry to select it.
8. Select Tools>Create Netlist from the top menu.
9. Left-click the PSpice tab.
10. Make sure that the Create Hierarchical Format Netlist box is cleared.
11. Change the name of the resulting file to Flat.net so that you can later view both netlist formats for comparison.
(Check that path and file name remains valid)
* source HIER_CLIP
D_U1_D1 N00049 U1_VCC D1N3940
V_U1_V1 U1_VCC 0 5
D_U1_D2 0 N00049 D1N3940
R_U1_R1 N00049 N00040 1k TC=0,0
R_U1_R2 N00049 U1_VCC 3.3k TC=0,0
R_U1_R3 0 N00049 1k TC=0,0
R_U1_R4 0 N00058 20K TC=0,0
C_U1_COUT N00049 N00058 0.47u TC=0,0
V_V1 N00040 0 DC 0Vdc AC 1Vac
R_R1 0 N00058 1G TC=0,0
R_R2 0 N00049 1G TC=0,0
D_U2_D1 N00049 U2_VCC D1N3940
V_U2_V1 U2_VCC 0 5
D_U2_D2 0 N00049 D1N3940
R_U2_R1 N00049 N00040 1k TC=0,0
R_U2_R2 N00049 U2_VCC 3.3k TC=0,0
R_U2_R3 0 N00049 1k TC=0,0
R_U2_R4 0 N00058 100K TC=0,0
C_U2_COUT N00049 N00058 0.47u TC=0,0
12. Close the netlist.
Now repeat the steps to create a netlist but select the hierarchical format this time, as follows:
13. Go to the Project Manager window for Hier_clip.
14. Left-click the design (dsn) file entry to select it.
15. Select Tools>Create Netlist from the top menu.
16. Left-click the PSpice tab.
17. Make sure that the Create Hierarchical Format Netlist is checked.
18. Rename the resulting file name to Hier.net so that you can later view both netlist formats for comparison.
(Note, the previous file name will have been remembered in the dialog)
(Again, check that path and file name remains valid)
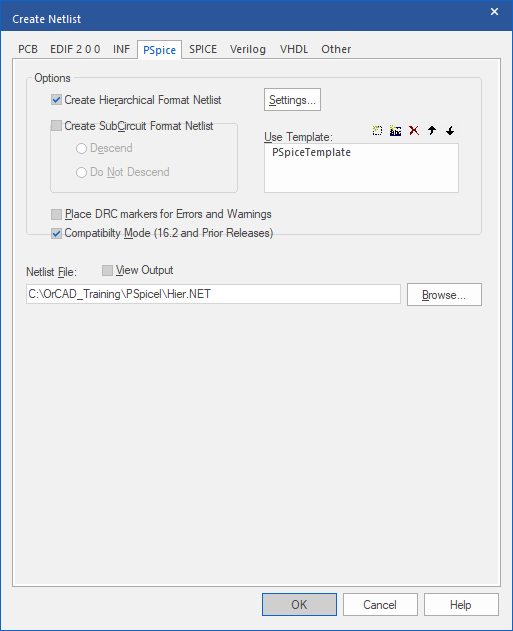
19. Left-click>OK to generate the netlist.
(If there are any warnings issued when the netlist is created, just accept them)
20. Examine the resulting netlist.
Notice the subcircuit definition generated for CLIP_BOT. It is instantiated in the netlist twice. The parameters for Rval are passed to each occurrence of the subcircuit.
The netlist should appear similar to the following listing:
* source HIER_CLIP
X_U1 N00040 N00049 N00058 Clip_bot PARAMS: RVAL=20K
V_V1 N00040 0 DC 0Vdc AC 1Vac
R_R1 0 N00058 1G TC=0,0
R_R2 0 N00049 1G TC=0,0
X_U2 N00040 N00049 N00058 Clip_bot PARAMS: RVAL=100K
.SUBCKT Clip_bot IN MID OUT PARAMS: RVAL=1
D_D1 MID VCC D1N3940
V_V1 VCC 0 5
D_D2 0 MID D1N3940
R_R1 MID IN 1k TC=0,0
R_R2 MID VCC 3.3k TC=0,0
R_R3 0 MID 1k TC=0,0
R_R4 0 OUT {RVAL} TC=0,0
C_COUT MID OUT 0.47u TC=0,0
.ENDS

End of Lab
All content Copyright 2022 Parallel Systems Ltd.