
All content Copyright 2022 Parallel Systems Ltd.
1. Open the routed.brd file if it is not already opened.
2. Either use the “Z” stroke or Display>Zoom>Window to zoom in to any area of the design so that only two or three components fill the Editor display.
3. Find an existing etch line that you want to alter, then left-click the Add Connect icon. As an alternative, you can move your cursor over a piece of etch and right-click>Add Connect.
4. Activate Options and check / set the Replace Etch option.
5. Start adding a line from a point on an existing etch line, then define a path that would form a loop:
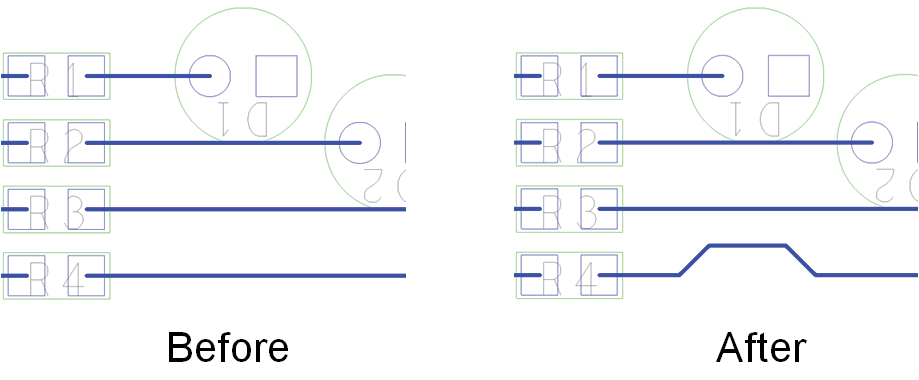
When you click on part of the original line, the older part of the loop disappears.
6. Right-click>Done from the pop-up menu.
7. Select Edit>Delete from the top menu.
8. Activate Find, enable only Cline Segs
9. Move the mouse back to the canvas and right-click>Cut.
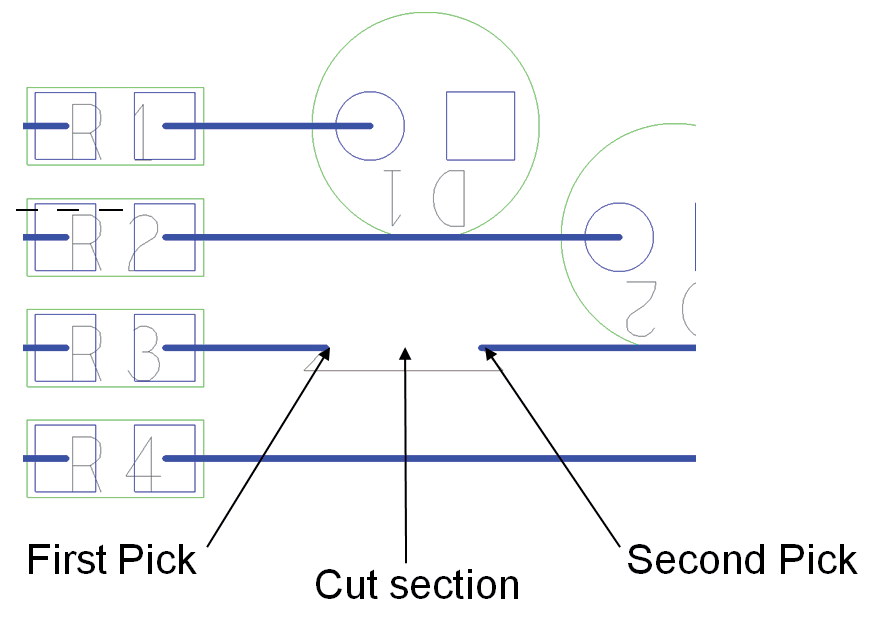
10. Left-click two points within a single segment, where you want the cut to occur.
The selected section is highlighted.
11. Right-click>Done.
The highlighted portion is deleted, leaving a ratsnest in its place.
Add the connection back using the skills you have learned for manual routing.
12. Left-click the Slide icon in the toolbar.
13. Activate Find, check that only Cline Segs is on.
14. Right-click>Cut from the pop-up menu
15. Left-click two points, within a single segment, where you want to define a section.
As soon as you make the second click you will notice that the section is now moveable.
16. Left-click on the new location or position for the section of etch you are sliding.
17. Right-click>Done.
18. Select Edit>Change Objects from the top menu.
19. Activate Find, enable only Cline Segs.
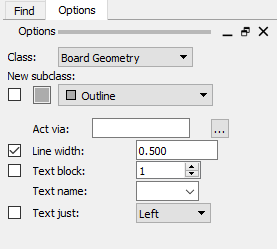
20. Activate Options, set the options to match the next figure – Enable Line Width and change the value in the Line Width field to 0.5mm.
21. Move the mouse back to the canvas and right-click>Cut from the pop-up menu.
22. Left-click on two points, within a single segment, where you want to define a section to be changed.
The new section is highlighted and changes width immediately.
23. Right-click>Done.
24. Do not exit out of the board. We will use it in the following lab.
End of Lab
All content Copyright 2022 Parallel Systems Ltd.