
All content Copyright 2022 Parallel Systems Ltd.
1. Select File>Open and open the release.brd from Lab 11, or use File>Recent Files to open the file.
2. Select Setup>Colors from the top menu.
3. Select the Manufacturing folder.
4. Turn ON the visibility button for the AUTOSILK_TOP subclass.
5. In the Colour Palette, select a colour, like white, and assign it to the AUTOSILK_TOP layer.
6. Select the Stack-up folder.
7. Turn OFF the visibility for PIN on the BOTTOM.
We will be working with the objects on the top of the board.
8. Select the Geometry folder.
9. Turn OFF the visibility for ASSEMBLY_TOP and ASSEMBLY_BOTTOM.
10. Select the Components folder.
11. Toggle ALL subclasses OFF.
12. Left-click>OK to close the Colour setup.
13. Select Manufacture>Silkscreen from the top menu.
The Auto Silkscreen parameter form appears.
14. Set the parameters as shown:
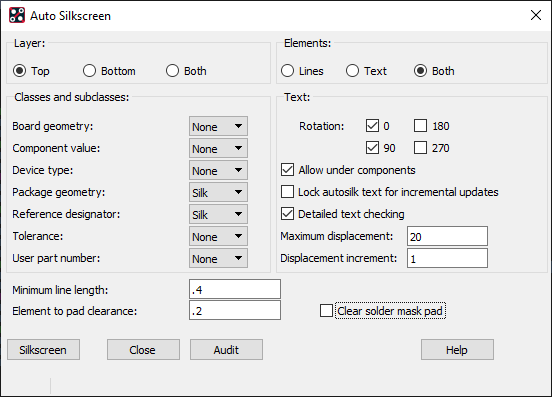
15. Left-click>Silkscreen
16. Select Setup>Application Mode>Placement Edit from the top menu.
17. Move the mouse to the background canvas and right-click>Super filter>Text
18. Go back to Manufacture>Silkscreen, this time left-click>Audit
19. Select File>Viewlog from the top menu.
The autosilk.log file is displayed. Use the scroll bar to review this file.
20. Left-click on the location of a “text error” in the log, the screen will be centred at that location and the text can be moved with a left-click to attach it to the cursor and a left-click to place it at a new, better, location. (right-click>rotate is available when the text is attached to the cursor)
21. Move through the listed items, don’t worry about any lines listed. Close the log and re-run the Audit, check the log and correct any remaining errors, if time permits.
22. Select File>Save from the top menu.
A window appears and warns you that the release.brd file already exists. It asks if you want to overwrite the file.
23. Left-click>Yes to confirm the overwrite
The file is written to disk
Keep this board file open for the next lab.
End of Lab
All content Copyright 2022 Parallel Systems Ltd.