
All content Copyright 2022 Parallel Systems Ltd.
1. Select Options>Design Template.
2. Select the Page Size tab at the top of the window that opens. Make sure the Page Size is set to A.
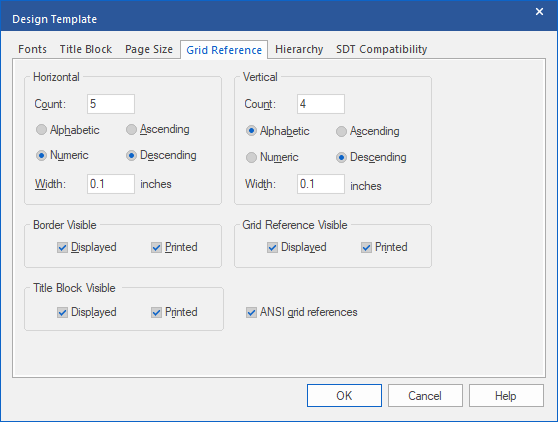
3. Select the Grid Reference tab. The settings should match the following picture.
4. Leave all the other tab settings as they are, apart from:
5. Left-click on the Title Block tab.
6. In the Title field, enter:
Lesson8
7. In the Organization Name field, enter your company name.
8. In the Organization Address1 field, enter your company street address.
9. In the Organization Address2 field, enter city, state, and zip code.
10. Use the Address 3 and 4 fields if you need to.
11. In the Document Number field, enter:
ABC-12345678
12. In the Revision field, enter: A
13. Optional – Add a Cage Code IF you need the information on your design pages.
US987654
14. Left-click the browser button to the right of the Library Name field, and navigate to your training directory, C:\OrCAD_Training\Capture.
15. Left-click on Training-lib.olb and left-click>Open.
The above path may vary, depending upon your training site and where the Cadence software has been installed.
16. In the Title Block Name field, enter:
TitleBlock0
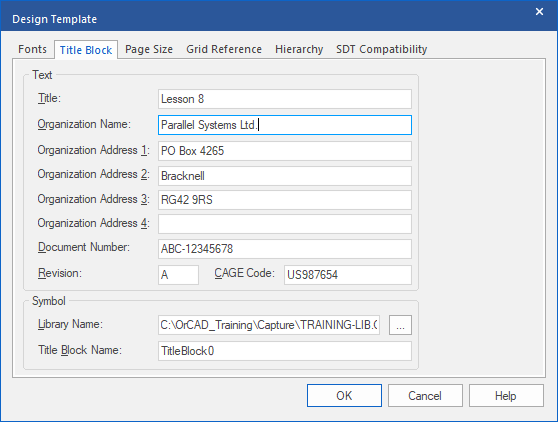
17. Compare your settings to the following example, and left-click>OK.
(The following is an example only.)
This design template will take effect when you create a new schematic in Lesson 8. The default settings for page size, grid reference, and fonts will also be applied.

End of Lab
All content Copyright 2022 Parallel Systems Ltd.