
All content Copyright 2022 Parallel Systems Ltd.
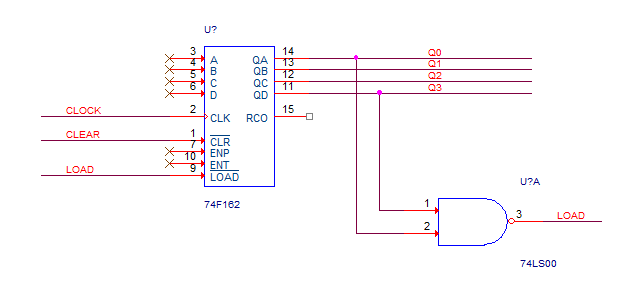
1. Take a moment to examine the following schematic, use this example as a guide.
2. Make sure the schematic window is active.
3. Select Place>Part from the pull-down menu on the menu bar.
The Place Part window appears to the right of the Icon toolbar.
4. Left-click the Add Library button.
The Browse File window appears.
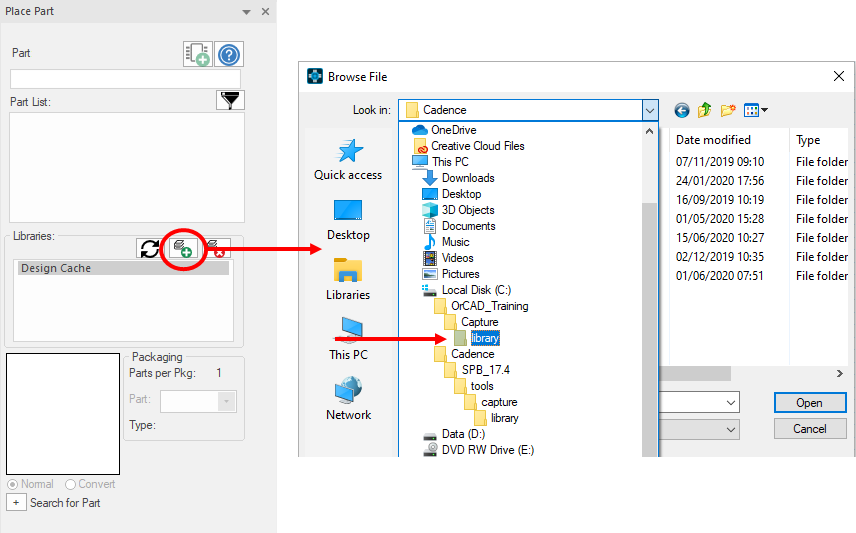
The Look In field should be set to C:\OrCAD_Training\Capture\library since this path was used in a previous lab to add symbols from the capsym.olb to the trng.olb The provided Capture libraries have been copied there for us in the course.
For a “default” installation, the Look In field would be set to C:\Cadence\SPB_17.4\tools\capture\library, this is where all the Capture libraries are stored by the installer.
(The Look In path may vary, if necessary, use the Windows Explorer browsing to get to the required library location for the course)
5. Select the Counter.olb library file and left-click>Open.
The COUNTER library is added to the Libraries list in the Place Part window, and all the parts in this library are listed in the Part List above.
6. In the Part field, enter:
74F162
Observe how each character you enter is used to search the Part List for all matching entries. A picture of the 74F162 part is shown in the lower right corner of the Place Part window.
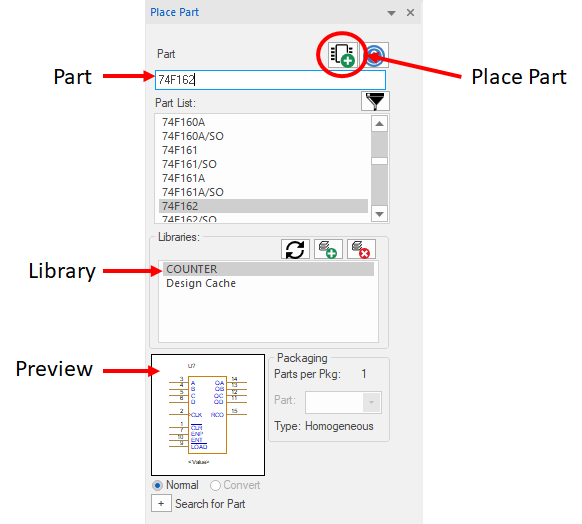
7. At the top right of the Place Part window, left-click on the Place Part icon.
(Or use the Enter key, or double-click on the part entry in the Part List)
The part silhouette attaches to the cursor.
8. With the part “floating” on the cursor, select a location on the schematic page and left-click to place the part on the page.
The part silhouette remains attached to the cursor, ready to place more instances of it.
9. Right-click>End Mode from the pop-up menu.
10. Left-click anywhere in the page to deselect the newly added part.
11. Select File>Save.
Note
The 74F162 part was in the COUNTER library. This library was added to the Libraries list. This library list is stored in the Capture.ini file.
12. Make sure the schematic window is active, and return to the Place part window.
If the window is not open press the P key on the keyboard.
13. In the Place Part window left-click the plus sign (+) to the left of Search for Part.
14. In the Search For field, enter:
74LS00
15. Set the Library Path field (at the bottom of this section) to
C:\OrCAD_Training\Capture\library If necessary, use the Browse button to set it.
Note
If the filter is set, enter the * symbol into the Place Part box and then press the <Enter> key. This resets the setting.
16. Left-click the Part Search icon.
The search results are shown in the Libraries list (for example, 74LS00/Gate.olb). This means that the 74LS00 part was found in the GATE library.
17. Double-click on the 74LS00/Gate.olb entry in the list.
The GATE library is added to the Libraries list in the Place Part window, and the 74LS00 part is automatically selected and “floating” on the cursor.
18. Add this part to the schematic.
19. Press Esc to end the Place Part command.
20. Left-click anywhere in the page to deselect the newly added part.
21. Select File>Save.
Note
The 74LS00 part was in the Gate library. Since you did not know which library this part was in, you searched all Capture libraries before adding the part. Once the 74LS00 was found, the Gate library was added to the Libraries list.
22. Select both of the parts on the current page, drag a window, for example.
23. Right-click>Edit Properties.
24. When the Property Editor appears, find the column or row for PCB Footprint and enter the following values:
74LS00 = SOIC14
74F162 = SOIC16
25. Close the Property Editor by moving to the tab at the top and right-clicking>Close.
Note
We will go into much more detail on using the Property Editor in Lesson 13 of this course.
End of Lab
All content Copyright 2022 Parallel Systems Ltd.