
All content Copyright 2022 Parallel Systems Ltd.
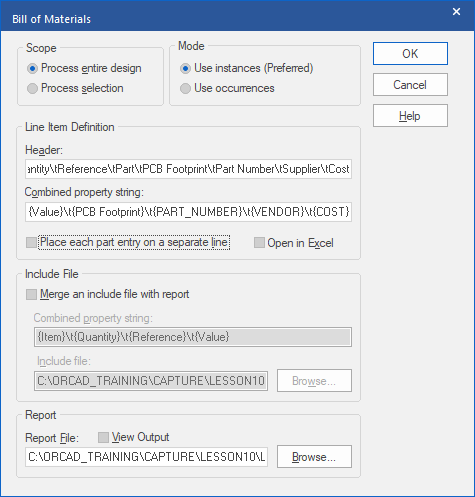
1. Left-click in the Project Manager, then left-click on the design (dsn) file entry and select Tools>Bill of Materials from the top menu.
2. Left-click on Place each part entry on a separate line (turn checkbox on).
3. Left-click on View Output (turn checkbox on).
Note
If you prefer, there is also an option to open the Bill-of-Materials output straight into Excel for a row & column format, select the Open in Excel instead of the View Output. Note that, if checked, View Output will need to be unchecked before Open in Excel can be enabled, and vice versa.
4. In the Header field, specify a line of titles for the columns of data that will be included in the BOM. The full list should read as follows:
Item\tQuantity\tReference\tPart\tPCB Footprint\tPart Number\tSupplier\tCost
Note
What appears in the header line is user defined.
The “t” inserts a tab character between fields of data in the BOM report for both the Header line and the Property String line.
5. In the Combined property string field, specify the properties whose values you want included in the BOM (under the titles you just listed in the previous step). The full list should read as follows:
{Item}\t{Quantity}\t{Part Reference}\t{Value}\t{PCB Footprint}\t{PART_NUMBER}\t{VENDOR}\t{COST}
Note
The property names need to match the names of the properties in the schematic, the case is ignored though so, any casing of Cost, for example, will be recognised from the property name.
Property names must be enclosed in curly braces. The sequence of names should correspond to the sequence of column titles in the Header list, otherwise the BOM output could be pretty confusing!
6. Left-click>OK to generate the Bill of Materials report as a text file.
(You can check the “Open in Excel”, if you have Microsoft Office installed.)
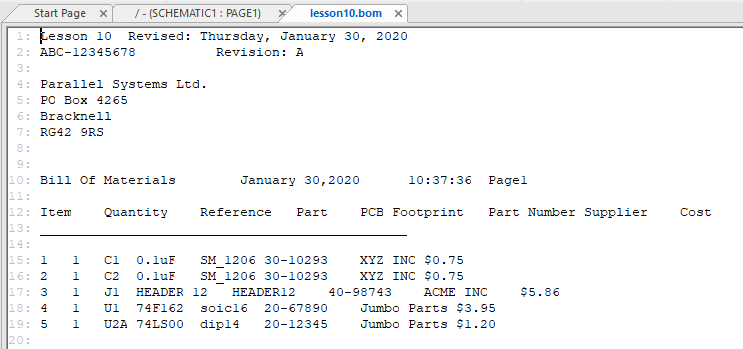
Double-click on the BOM file entry in the Project Manager window to view the BOM text file, notice the inclusion of the PCB Footprint, Supplier, and Cost data. This output is tab-delimited text file this could also be loaded into Excel or other applications that handle the format.
7. Close the report.
8. Select File>Close Project.
Note
With the default Bill-of-Materials extractor the Header and Property Sting lines cannot be saved if you wish to switch from one format to another. However, it is recommended that you create a simple text file and simply copy and paste the 2 lines from the text file to the extractor.
The following is the output for a text file.
Note
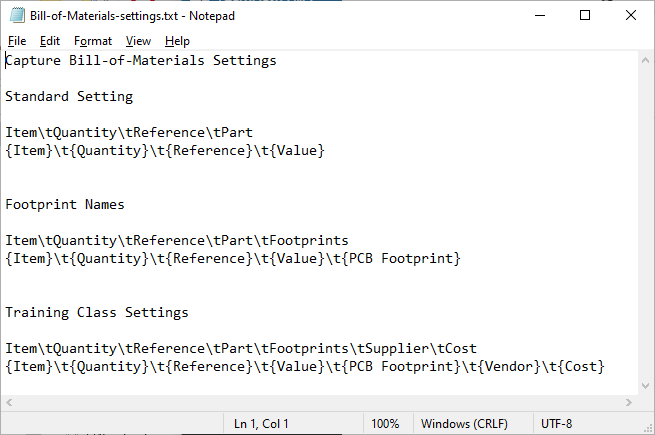
You can also save the Property settings for different text string settings for the Bill-of-Materials extractor by copy/paste of these lines to and from a text file.
You can try this by using the supplied Bill-of-Materials-settings.txt text file that accompanies these labs. It can be found in the C:\OrCAD_Training\Capture directory.

End of Lab
All content Copyright 2022 Parallel Systems Ltd.